IT online Exam

Thursday, 18 June 2020

HTML5 New Form Input Type Elements

HTML5 introduces several new <input> types like email, date, time, color, range, and so on. to improve the user experience and to make the forms more interactive. 


In this section we're going to take a brief look at each of the following new input types:


  • color
  • number
  • url
  • image
  • date
  • datetime-local
  • time
  • month
  • week
  • email
  • range
  • search
  • file
  • tel


Input Type Color
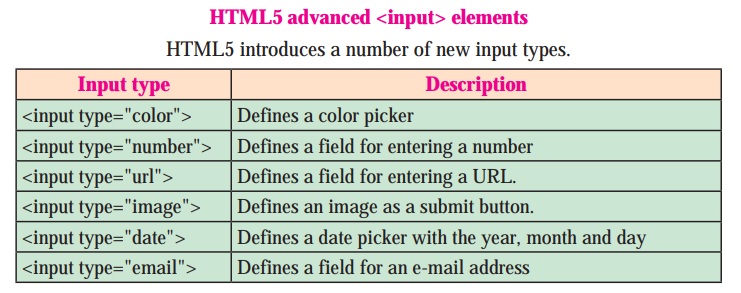
The <input type="color"> is used for input fields that should contain a color. It displays a color picker.

The color input type allows the user to select a color from a color picker and returns the color value in hexadecimal format (#rrggbb). If you don't specify a value, the default is #000000, which is black.

Example :

    <label for="favcolor">Select your favorite color:</label>
    <input type="color" id="favcolor" name="favcolor">


Input Type Number
The <input type="number"> defines a numeric input field.
The number input type can be used for entering a numerical value. You can also restrict the user to enter only acceptable values using the additional attributes min, max, and step.


Example :

  <label for="quantity">Quantity (between 1 and 5):</label>
  <input type="number" id="quantity" name="quantity" min="1" max="5">


Input Type URL
The <input type="url"> is used for input fields that should contain a URL or web addresses.

You can use the multiple attribute to enter more than one URL. Also, if required attribute is specified browser will automatically carry out validation to ensure that only text that matches the standard format for URLs is entered into the input box. 


Example :

    <label for="myurl">Enter Website URL:</label>
    <input type="url" name="myurl"  id="myurl" required>


Input Type Image
<input type=image"> defines a image as button for submitting form data to a form-handler.


Example :

    <input type="image" src="images/pic.gif">


Input Type Date
The <input type="date"> is used for input fields that should contain a date. It defines a date picker which allows the user to select a date from a drop-down calendar.

The date value includes the year, month, and day, but not the time.


Example :

   <label for="birthday">Birthday:</label>
   <input type="date" id="birthday" name="birthday">


Input Type Datetime-local
The <input type="datetime-local"> specifies a date and time input field, with no time zone.
The datetime-local input type allows the user to select both local date and time, including the year, month, and day as well as the time in hours and minutes.


Example :

  <label for="birthdaytime">Birthday (date and time):</label>
  <input type="datetime-local" id="birthdaytime" name="birthdaytime">


Input Type Time
The <input type="time"> allows the user to select a time (no time zone).

The time input type can be used for entering a time (hours and minutes).

Browser may use 12- or 24-hour format for inputting times, based on local system's time setting.


Example :


  <label for="appt">Select a time for appointment:</label>
  <input type="time" id="appt" name="appt">


Input Type Month
The <input type="month"> allows the user to select a month and year from a drop-down calendar.

The value is a string in the format "YYYY-MM", where YYYY is the four-digit year and MM is the month number. 


Example :


  <label for="birthmonth">Birthday (month and year):</label>
  <input type="month" id="birthmonth" name="bdaymonth">


Input Type Week
The <input type="week"> allows the user to select a week and year from a drop-down calendar.


Example :

  <label for="week">Select a week:</label>
  <input type="week" id="week" name="week">


Input Type Email
The <input type="email"> is used for input fields that should contain an e-mail address.

The email input type allows the user to enter e-mail address. It is very similar to a standard text input type, but if it is used in combination with the required attribute, the browser may look for the patterns to ensure a properly-formatted e-mail address should be entered.


Example :

  <label for="email">Enter your email:</label>
  <input type="email" id="email" name="email">


Input Type Range
The <input type="range"> defines a control for entering a number whose exact value is not important (like a slider control).

The range input type can be used for entering a numerical value within a specified range. It works very similar to number input, but it offers a simpler control for entering a number.

Default range is 0 to 100. However, you can set restrictions on what numbers are accepted with the min, max, and step attributes


Example :


  <label for="vol">Volume (between 0 and 50):</label>
  <input type="range" id="vol" name="vol" min="0" max="50">


Input Type Search
The <input type="search"> is used for creating search input fields.

A search field typically behaves like a regular text field, but in some browsers like Chrome and Safari as soon as you start typing in the search box a small cross appears on the right side of the field that lets you quickly clear the search field. 


Example :

  <label for="gsearch">Search Google:</label>
  <input type="search" id="gsearch" name="gsearch">


Input Type File
The <input type="file"> defines a file-select field and a "Browse" button for file uploads.

Example :

  <label for="myfile">Select a file to upload:</label>
  <input type="file" id="myfile" name="myfile">


Input Type Tel
The <input type="tel"> is used for input fields that should contain a telephone number.

Browsers don't support tel input validation natively. However, you can use the placeholder attribute to help users in entering the correct format for a phone number, or specify a regular expression to validate the user input using the pattern attribute.


Example :


  <label for="myphone">Telephone Number:</label>
  <input type="tel" id="myphone" placeholder="xx-xxxx-xxxx" required>


A Form Example :


Monday, 15 June 2020

About HTML5

(Not in Syllabus - For extra Knowledge)

HTML5 

HTML5 is the latest specification of the HTML language
HTML5 introduces a number of new elements and attributes that can help you in building modern websites.


History of HTML


  • HTML was created by Sir Tim Berners-Lee in late 1991 but was not released officially, which was published in 1995 as HTML 2.0. HTML 4.01 was published in late 1999 and was a major version of HTML.
  • HTML is a very evolving markup language and has evolved with various versions updating. Long before its revised standards and specifications are carried in, each version has allowed its user to create web pages in the much easier and prettier way and make sites very efficient.
  • HTML 1.0 was released in 1993 with the intention of sharing information which can be readable and accessible via web browsers. But not much of the developers were involved in creating websites. So the language was also not growing.
  • Then comes the HTML 2.0, published in 1995; which contains all the features of HTML 1.0 along with that few additional features; which remained as the standard markup language for designing and creating websites until January 1997 and refined various core features of HTML.
  • Then comes the HTML 3.0, where Dave Raggett who introduced a fresh paper or draft on HTML. It included improved new features of HTML, giving more powerful characteristics for webmasters in designing web pages. But these powerful features of new HTML slowed down the browser in applying further improvements.
  • Then comes the HTML 4.01 which is widely used and was a successful version of HTML before HTML 5.0, which is currently released and used worldwide. HTML 5 can be said for as an extended version of HTML 4.01 which was published in the year 2012.


Members of the World Wide Web Consortium (W3C) - 1995

W3C


The World Wide Web Consortium (W3C) is an international community where Member organizations, a full-time staff, and the public work together to develop Web standards. 
Led by Web inventor and Director Tim Berners-Lee and CEO Jeffrey Jaffe, W3C's mission is to lead the Web to its full potential by developing protocols and guidelines that ensure long-term growth for the Web

W3C members work together to design web technologies that build upon its versatility, giving the world the power to enhance communication and commerce for anyone, anywhere, anytime, and using any device.


Long Term Goals for the Web 

  • Web for Everyone 
  • Make the Web available regardless of hardware, software, language, culture, etc. 
  • Web on Everything 
  • Make Web access from any kind of device as simple and convenient as possible 
  • Knowledge Base 
  • Enable people to solve problems that would be otherwise too complex or tedious to solve 
  • Trust and Confidence
  • Make accountability, security, confidence and confidentiality possible for all users


W3C TEAM - 2008

Today, W3C is comprised of more than 400 members including the world's foremost technology companies such as HP, IBM, Nokia, Microsoft, At&T, Intel, Oracle, Xeroz, etc..


Features of HTML5

New Semantic Elements − These are like <header>, <nav>, <main>, <article>, <aside>, <section> and <footer> . New <!doctype> declaration.


New !DOCTYPE declaration


A Document Type Declaration, or DOCTYPE for short, is an instruction to the web browser about the version of markup language in which a web page is written.
A DOCTYPE declaration appears at the top of a web page before all other elements. According to the HTML specification or standards, every HTML document requires a valid document type declaration to insure that your web pages are displayed the way they are intended to be displayed.


Forms 2.0 − Improvements to HTML web forms where new types of fields and attributes have been introduced for <input> tag.


Persistent Local Storage − To achieve without resorting to third-party plugins.


With web storage, web applications can store data locally within the user's browser.
Before HTML5, application data had to be stored in cookies, included in every server request. Web storage is more secure, and large amounts of data can be stored locally, without affecting website performance.

Unlike cookies, the storage limit is far larger (at least 5MB) and information is never transferred to the server.
Web storage is per origin (per domain and protocol). 
All pages, from one origin, can store and access the same data.

HTML web storage provides two objects for storing data on the client:
window.localStorage - stores data with no expiration date
window.sessionStorage - stores data for one session (data is lost when the browser tab is closed)


WebSocket − A next-generation bidirectional communication technology for web applications.

HTML5's WebSocket protocol gives provision for such persistent real-time bi-directional TCP connection between a client (browser) and a server, without the need/use of AJAX methodology or 'Long Polling', doing away with headers thereby decreasing network load and improving performance. You can think of WebSocket as a full-duplex messaging system, akin to land-line telephones, where users at both ends can speak and hear simultaneously.

Websocket Benefit 
- Websocket enables the server to push data to the connected clients. 
- Reduce unnecessary network traffic and latency using full-duplex through a single connection (instead of two). 
- Streaming through proxies and firewalls, supporting simultaneously upstream and downstream communication. 
- Backward compatible with the pre-WebSocket world by switching from an HTTP connection to WebSockets.


Apps that should use Websocket 
- Multi-User Apps. 
- Real-Time Apps.
- Apps where live data is needed, like a stock market app…


Server-Sent Events − HTML5 introduces events which flow from web server to the web browsers and they are called Server-Sent Events (SSE).

Server-Sent Events (SSE) is a server push technology enabling a client to receive automatic updates from a server via HTTP connection. The Server-Sent Events EventSource API is standardized as part of HTML5 by the W3C.

A server-sent event is when a web page automatically gets updates from a server.
This was also possible before, but the web page would have to ask if any updates were available. With server-sent events, the updates come automatically.
Examples: Facebook/Twitter updates, stock price updates, news feeds, sport results, etc.


Canvas − This supports a two-dimensional drawing surface that you can program with JavaScript.

HTML5 supports SVG (Scalable Vector Graphics), canvas, and other virtual vector graphics, whereas in HTML, using vector graphics was only possible by using it in conjunction with different technologies like Flash, VML (Vector Markup Language), or Silverlight.

The Canvas API provides a means for drawing graphics via JavaScript and the HTML <canvas> element. Among other things, it can be used for animation, game graphics, data visualization, photo manipulation, and real-time video processing.
The Canvas API largely focuses on 2D graphics. The WebGL API, which also uses the <canvas> element, draws hardware-accelerated 2D and 3D graphics.


Audio & Video − You can embed audio or video on your webpages without resorting to third-party plugins.

The HTML5 specification introduced the video element for the purpose of playing videos, partially replacing the object element. HTML5 video is intended by its creators to become the new standard way to show video on the web, instead of the previous de facto standard of using the proprietary Adobe Flash plugin, though early adoption was hampered by lack of agreement as to which video coding formats and audio coding formats should be supported in web browsers.


Media elements like <video> and <audio> have additional JavaScript functionality beyond normal HTMLElements that allow you to interact or control the media.

Various Properties and Methods are provided in Javascript to interact with the video element. You can write code  on events occurring to video such as playing, error, ended


Geolocation − Now visitors can choose to share their physical location with your web application.


Users can select their location on map

The HTML5 geolocation feature lets you find out the geographic coordinates (latitude and longitude numbers) of the current location of your website's visitor.
This feature is helpful for providing better browsing experience to the site visitor. For example, you can return the search results that are physically close to the user's location.


Microdata − This lets you create your own vocabularies beyond HTML5 and extend your web pages with custom semantics.


Drag and drop − Drag and drop the items from one location to another location on the same webpage.
Shoping website page where users can drag items to shopping cart

Drag and Drop (DnD) is powerful User Interface concept which makes it easy to copy, reorder and deletion of items with the help of mouse clicks. This allows the user to click and hold the mouse button down over an element, drag it to another location, and release the mouse button to drop the element there.


HTML Drag and Drop interfaces enable applications to use drag-and-drop features in browsers. The user may select draggable elements with a mouse, drag those elements to a droppable element, and drop them by releasing the mouse button


Wednesday, 13 May 2020

HTML Forms Revision

HTML Forms

PART 1

FOR VIDEO TUTORIAL CLICK HERE

TOPICS
  • Introduction to Forms
  • Form Elements
  • <input> tag
  • Textbox & Password box elements
  • Radio button and Check box elements
  • Submit and Reset buttons
  • Few attributes of <input> tag


Introduction to Forms

Forms are an interactive feature of many websites.

Forms are the primary method for getting data from visitors of the web site.


A form takes the input and sends the data to webserver on clicking submit button.

On the web server backend application scripts will collect the data and store it on the database on the server.


Creating Forms
To create forms in HTML web page
<form> element is used
It is a container tag which will contain all the form elements


Form Elements


<input> element
The <input> element is the most important form element.
Using <input> tag and its type attribute you can create various form elements.
It is an empty tag.


To create text box:


       First Name :   <input type=“text” name=“fname” size=20>

It defines a single-line text input field.


To create Password box

   Password:    <input type=“password” name=“pwd” size=16>

The characters in a password field are masked (shown as asterisks or circles).

Radio Button
A radio button is used to select one of many given choices.
Radio buttons are shown in radio groups to show a set of related options, only one of which can be selected.

To create Radio button:
Example - 
   Gender: 
  <input type=“radio” name=“gender” value=“male”>  Male

 <input type=“radio” name=“gender” value=“female”>  Female


Checkbox
Checkboxes are used for instances where a user may want to select multiple options

Checkboxes let a user select ZERO or MORE options of a limited number of choices.

To create Checkbox
Example -

<h2>Select your   Hobbies: </h2>
  <input type=“checkbox” name=“h_read” value=“reading”>  Reading

  <input type=“checkbox” name=“h_surf”  value=“surf”>  Surfing

  <input type=“checkbox” name=“h_music”  value=“music”> Listening to Music

Creating a Simple Form  (Form Example No. 1)

<!doctype html>
<html>
  <head>
     <title>Form example</title>
  </head>
  <body bgcolor=“#FFFFCC”>
     <h1>Submit your information</h1>
     <form>
          First Name :  <input type=“text” name=“fname”>
         <br> <br>
          Last Name : <input type=“text” name=“lname”>
         <br>  <br>
        Gender :
        <input type=“radio” name=“gender” value=“male”>  MALE
        <input type=“radio” name=“gender” value=“female”> FEMALE
        <br>  <br>
        Hobbies :
        <input type=“checkbox” name=“h_read” value=“reading”>    Reading
        <input type=“checkbox” name=“h_surf”  value=“surf”>  Surfing
        <input type=“checkbox” name=“h_music”  value=“music”>  Listening to Music
        <br><br>
        <input type=“submit” value=“SUBMIT”>
        <input type=“reset” value=“RESET”>
    </form>
</body>
</html>

Submit Button
The Submit Button allows the user to send the form data to the web server.
The form data is typically handled by a Web Server page with a script for processing input data.
The server page is specified in form's  action attribute.

Reset Button
A reset button is used to reset all form values to their default values. (clear the form)


Attributes of <input> tag
Type - Specifies the type <input> element to display
Name - Specifies the name of an <input> element
Size - Specifies the width (in characters) of an input field
Maxlength - Specifies the maximum number of character for an input field
Value - Specifies the default value for an input field
Checked - Specifies that an input field should be pre-selected when the page loads (only for radio buttons and checkbox fields)

Disabled - Specifies that an input field is disabled
Required - Specifies that an input field is required (must be filled out) before submitting the form
Readonly - Specifies that an input field is read only (cannot be changed)
Autofocus - Specifies that an <input> element should automatically get focus when the page loads (boolean attribute)

Placeholder – specifies a short hint that describes the expected value of an input field (e.g. a sample value or a short description of the expected format).
Title – Provides a tool tip for the input field.
Pattern – Specifies a regular expression that an <input> element's value is checked against.

A regular expression, or regex for short, is a pattern describing a certain amount of text.


FOR HOME WORK PRACTICE
Create the following forms :
1.

2.


3.


NOTES FOR READING


PART 2

FOR VIDEO TUTORIAL CLICK HERE

TOPICS

About Action attribute of <form> tag
Few attributes of <input> tag
Creating Drop-down list box
Attributes of <select> tag
<textarea> tag
Attributes of <textarea> tag

Action attribute of <form> tag
The Action attribute is used to specify where the form data is to be sent to the server after submission of the form.
Action=“URL”  -  It is used to specify the URL of the document where the data to be sent after the submission of the  form.

I have created a php script on my website which will give a response after submitting form to it, so specify the script in action attribute of forms you create...

Add the action attribute in <form> tag as per given below:

    <form action=“https://exza.in/response.php”>

The response.php web page will collect the form data and display back the contents.


Creating Drop-down list box
<select> tag is used to create drop-down list box consisting of a number of options, which a user can choose.
Each option is defined by an <option> tag.


In previous simple form example no. 1 add a dropdown list for selecting City.


Attributes of <select> tag
name – Defines a name for the drop-down list.
size – Defines the number of visible options in a drop-down list.
multiple – Specifies that multiple options can be selected at once.
selected – It specifies that an option should be pre-selected when the page loads. (for <option> tag)

      E.g. <select name=“city” size=3 MULTIPLE>

required – Specifies that the user is required to select a value before submitting the form.
autofocus – Specifies that the drop-down list should automatically get focus when the page.
disabled – Specifies that a drop-down list should be disabled.

      E.g. <select name=“city” size=3 MULTIPLE  AUTOFOCUS>


Creating multi-line text box
<textarea> tag is used to create multi-line text box in HTML.
The textarea element can hold unlimited number of characters.
The size of the box can be defined by cols and rows attributes.


In previous simple form example no. 1 add a textarea for Address.


Attributes of <textarea> tag
name – Specifies a name for a text area.
rows – Specifies the visible number of lines in a text area.
cols – Specifies the visible width of a text area.
maxlength – Specifies the maximum number of characters allowed in the text area.

   E.g. <textarea name=“address” cols=31 rows=5 maxlength=100>

required – Specifies that a text area is required. It must be filled out before submitting form.
autofocus – Specifies that the textarea should automatically get focus when the page loads.
readonly – Specifies that a text area should be read only (you cannot change).
placeholder – Specifies a short hint that describes the expected value of a text area.
disabled – Specifies that textarea should be disabled.


FOR HOME WORK PRACTICE

4.


5.


Tuesday, 12 May 2020

HTML Revision Part 2

Hyperlinks and Tables


Hyperlinks

  • What is Hyperlink?
  • How to create a Hyperlink?
  • What is URL?
  • Creating Image hyperlinks
  • Anchor Points
  • Internal Hyperlinks
  • External Hyperlinks
  • Hypermedia


What is Hyperlink?
Hyperlinks are an integral part of the World Wide Web 
It makes you jump from one location to another within web pages or even websites via references simply called as links or hyperlinks.


  • A hyperlink is a reference (an address) to a resource on the web.
  • Hyperlinks can point to any resource on the web : an HTML page, an image, a sound file, a movie, or other files, etc..
  • When you move the mouse over a link, the mouse arrow will turn into a little hand.


Appearance of Hyperlink -Text

  • Appears blue in color 
  • Hyperlink text is underlined when hovered
  • When the mouse cursor is placed over it, the arrow changes to hand and when clicked the pointed resource will open.


Default settings
An unvisited link is underlined and blue.
A visited link is underlined and purple.
An active link is underlined and red.

Note: The color and appearance of hyperlink can be changed using body tag attributes or thru CSS


A hyperlink can take many forms such as bold text, italic text, drop-down menus, pictures, animations, video, etc..


Hyperlinks are defined with the HTML  anchor tag (<a> tag):
       
        <a href="url">   link text    </a>


Example

<a href="https://www.w3schools.com">
               Visit our website
</a>


URL stands for Uniform Resource Locator.

It is the address or location for access of resources on the Internet. (web pages, images, videos, sound, animation, documents, etc.)


Attributes of <a> tag:
href – It specifies the destination address of the link.
title – It specifies extra information about an element. The information is most often shown as a tooltip text when the mouse moves over the element.
target – It defines where to open the linked document.

Example:


Output:


Target Attribute:
The target attribute specifies where to open the linked document.

The target attribute can have one of the following values:
_blank - opens the linked document in a new window or tab
_self - opens the linked document in the same window/tab
_parent - opens the linked document in the parent frame
_top - opens the linked document in the full window
framename - opens the linked document in a named frame


Anchor Points
Anchor points, scroll points or HTML bookmarks as some call them, make it possible to jump from one point on a page to another position on the same page by clicking a link. 


Example:


Output:


Internal Links:
Internal links are links that go from one page on a domain to a different page on the same domain. 
They are commonly used in main navigation. 
They allow users to navigate a website. 
They help establish information hierarchy for the given website.


External Links:
External Links are hyperlinks that point at a resource which is on another  website other than the domain the link exists on (source). 

In simple terms, if you link out to another website, this is considered an external link.


Hypermedia:
Hypermedia is an extension of hypertext that employs multiple forms of media such as text, graphics, audio or video sequences, still or moving graphics, etc. 


It extends the capabilities of hypertext systems by creating clickable links within multimedia. 
The most common hypermedia type is image links which are often linked to other web pages.


Tables

  • Introduction to Tables
  • <table>, <tr>, <th> and <td> tags
  • Attributes of <table> tag
  • <caption> tag
  • Attributes of <td>, <th> and <tr> tags
  • Using coslpan and rowspan attributes
  • Cellpadding and Cellspacing


Introduction to Tables
A table is made up of rows and columns.

<table> tag is used to create a table in HTML.
It is a container tag.


<tr> tag is used to create each row of the table.

<td> tag is used to specify data within table.
It defines the cells within a row.
<td> element contain all sorts of HTML elements; text, images, lists, other tables, etc.

<th> tag is used to specifies data within table
It is used to define the column headers.
<th> element aligns the cell content to center and displays in the text in bold.

Creating a simple table


Attributes of <table> tag
align – specifies the alignment of the table in the web page.
bgcolor – specifies the background color for the table.
border – specifies the border width (default value is 0)
width – specifies the width of the table. (Value - pixels or %)
height  – specifies the height of the table. (Value - pixels or %)

cellpadding – specifies the space between the cell wall and the cell content. (Value – pixels)
cellspacing – specifies the space in pixels between cells. (Value – pixels)


<caption> tag

  • The <caption> tag defines a table caption.
  • The <caption> tag must be inserted immediately after the <table> tag.
  • Align Attribute is used to specify the alignment of the <caption> Element. 
  • It is used to align the caption to the left, right, top and Bottom of a table.


Attributes of <td> & <th> tags

  • align – specifies the alignment for the cell content.
  •            (Values – left, center, right, justify)
  • valign – specifies the vertical alignment for the cell content.  (Values – top, middle, bottom)
  • bgcolor – specifies the background color for the cell.
  • width – specifies the width of the cell. 
  • height  – specifies the height of the cell. 
Example:


Merging cells

  • colspan – Specifies the number of columns a cell should span
  • rowspan – Specifies the number of rows a cell should span


Cellpadding and Cellspacing

cellpadding – specifies the space between the cell wall and the cell content. (Value – pixels)


cellspacing – specifies the space in pixels between cells. (Value – pixels)

E.g.  <table cellspacing="10px" cellpadding="5px">


Bitcoins